
PROTECT YOUR DNA WITH QUANTUM TECHNOLOGY
Orgo-Life the new way to the future Advertising by AdpathwayOur articles are not designed to replace medical advice. If you have an injury we recommend seeing a qualified health professional. For more information see out Terms and Conditions.
I’ve had some great questions sent in following our first Q&A style blog. I’m going to cover 2 more today; how to prescribe of plyometrics and when to introduce gait analysis and retraining.
Question 1, from Maria
“One thing I struggle with in the rehabilitation process is the build-up of plyometrics (which exercises, how many repetitions, rest in between sets). Maybe this could be part of one of your newsletters?”
I can empathise with Maria here, plyometrics can be challenging to plan and include within rehab so I’m going to take you through 3 stage approach to offer some guidance.
It’s inspired by the work of Eamonn Flanagan and others and I’d highly recommend listening to this Sportsmith podcast with Eamonn where he goes through plyometrics in more detail.
Here’s my 3 stage approach to plyometrics for injured athletes:

These stages may overlap and some athletes may be able to come in at phase 2 or 3 so we need to adapt it to suit the individual. Let’s expand a little on each phase:
Preparation
In early rehab, we want to reduce pain and ensure it’s a safe and appropriate time to introduce impact in terms of the individual, their injury and its stage of healing. Active swelling, irritable symptoms or loss of joint range are usually signs that someone isn’t ready for plyometrics so need to be addressed first.
Plyometrics are often used to improve power. Power = Force x Velocity so it’s a combination of strength and speed. In a nutshell, it’s hard to be powerful if you’re not strong!
Build strength is a key part of the preparation for plyometrics and power. It may improve plyometric ability on its own. Kirwan et al. (2024) demonstrated this in patients with Achilles Tendinopathy. Their hopping ability increased significantly following an eccentric loading programme even though no power/ plyometric work was included.
We may choose in this phase to work on the components of plyometrics to improve confidence and introduce impact at a manageable level. This could include working on just the propulsive phase and just landing and load absorption before going on to include the ‘rebound’. Here’s how we might do this with bounding:
- Propulsion – take off on the injured leg and land on the healthy leg
- Load absorption – take off on the healthy leg and land on the injured one. Control the landing but don’t take off again.
- Rebound – take off on the injured leg, land on the healthy leg and quickly rebound to land once again on the injured leg. Repeat so both legs are exposed to take off, landing and rebound.
Typically, these will be low intensity (e.g. small bounds, relatively low effort) and low volume initially to ensure they are not provocative. For example, I might suggest 3 sets of 5 reps initially with just 1 or 2 exercises. I often consider the directions involved in the sport so the 2 exercises might be 1 with more vertical forces (e.g. squat jumps or skipping in place) and 1 with more horizontal forces (forward jumps or bounds).
Technique and Tolerance
If an athlete is managing phase 1 well without symptom reaction, we can often progress onto phase 2. The focus here is building impact tolerance with higher volumes of plyometrics with the desired technique.
The intensity is increased slightly, but it remains sub-maximal effort (a term Eamonn uses a lot in his podcast above). There doesn’t seem to be a ‘gold standard’ in terms of volume within the literature and there is a lot of variety. Silbernagel et al. (2007) had just one power exercise in their Achilles Tendinopathy rehab programme – 3 sets of 20 quick rebounds. By contrast, Sancho et al. (2019) include higher volumes in their Achilles rehab protocol, including some exercises with 3 sets of 60 jumps:

Image Source: Sancho et al. (2019)
There appears to be some variety in more performance-focused studies too. Recent work by Engeroff et al. (2023) progressed from 5 sets of 10 hops to 15 sets of 10 and included very short rest periods:

Image Source: Engeroff et al. (2023)
This is in marked contrast to Beattie et al. (2017) who also focussed on 1 exercise in a session, but at much lower volumes, typically 4 sets of just 3 to 5 reps. So I can certainly understand where the confusion comes from!
If we pause a minute and consider the common situation a runner may be in when we introduce plyometrics it can help – usually, it’s mid to end-stage rehab, they have a strength plan which they are combining with a return to running programme and we’re adding plyometrics to the mix too!
So I tend to think less is more and the higher the intensity of the plyometrics the lower the volume and the longer the rest period is needed.
In this phase where it’s still sub-maximal intensity, we might go for slightly higher volumes, such as 4 sets of 15 to 20 reps with 2 to 4 exercises but we’d be guided by the individual, their experience, goals and symptom response.
The other aspect we consider here is desired technique. It’s best to address this at lower intensities. There are few ‘gold standards’ for plyometric techniques that will suit every person so we’re often considering how we might modify the movement to influence load on injured/ sensitive tissues.
For example, a runner with Patellofemoral pain who tends to come into deep knee flexion during plyometrics which we’d expect to increase PF joint load. We might encourage a slightly shorter ground contact time to help address this.
By contrast, post-ACL surgery patients sometimes avoid loading into knee flexion during running and impact and this can lead to increased movement at the hip, trunk and pelvis or elsewhere in the kinetic chain. Here we might focus on a slightly softer landing allowing more movement at the knee.
High Intensity
Once a patient has built up some volume at sub-maximal intensity with desired technique we can aim to increase the intensity of the plyometrics. This will typically be with lower volumes and longer rest periods, for example, 3 sets of 4 to 8 reps with 2-3 minute rest between sets, 1 to 3 exercises in total.
The focus is on speed and explosive intent, typically with short ground contact times. This is often what people may consider more ‘true plyometrics’. There are lots of exercise options to consider here including squat jumps, box jumps and countermovement jumps, skipping, bounding, hill bounding, pogos, hops in place, forward hops etc.
Consider the safety aspects and the demands of the sport in terms of surface, direction, external load, double leg v single leg and technique. As with any aspect of what we do it will come down to a reasoning process not a recipe.
Athletes with more experience of plyometrics and non-irritable symptoms may manage higher volumes/ intensities while more complex cases that have been prone to flare up with increased load will need a more cautious approach.
Question 2, from AJ
“My question revolves around managing injured runners (runners who are currently having pain and needing to modify their volume/intensity). At what point do you implement gait retraining when injury is the issue and the goal isn’t just performance/running economy? Secondary question, would then be what are the 2-3 most common gait “faults” you see and your suggested retraining/cueing to improve them?”
Another good question!
Typically, I tend to include gait analysis at around session 3 or 4 with a runner. That’s because in session 1, I want to ensure training is at a manageable level, we have some rehab exercises in place, and the runner understands the injury and how to manage it. In session 2 we often need to fine-tune this a little to ensure both the running and rehab are at the right level. Once this is the case, they’ll need some time to apply the plan, so sessions 3 or 4 are often a good point to assess gait.
Symptoms and stages of injury will guide us too. Typically, a runner needs to be able to tolerate at least 5 minutes of running at preferred pace with minimal symptoms. If their pain is too irritable or it’s too early in their recovery, then they will often compensate in their gait, and the assessment can aggravate symptoms.
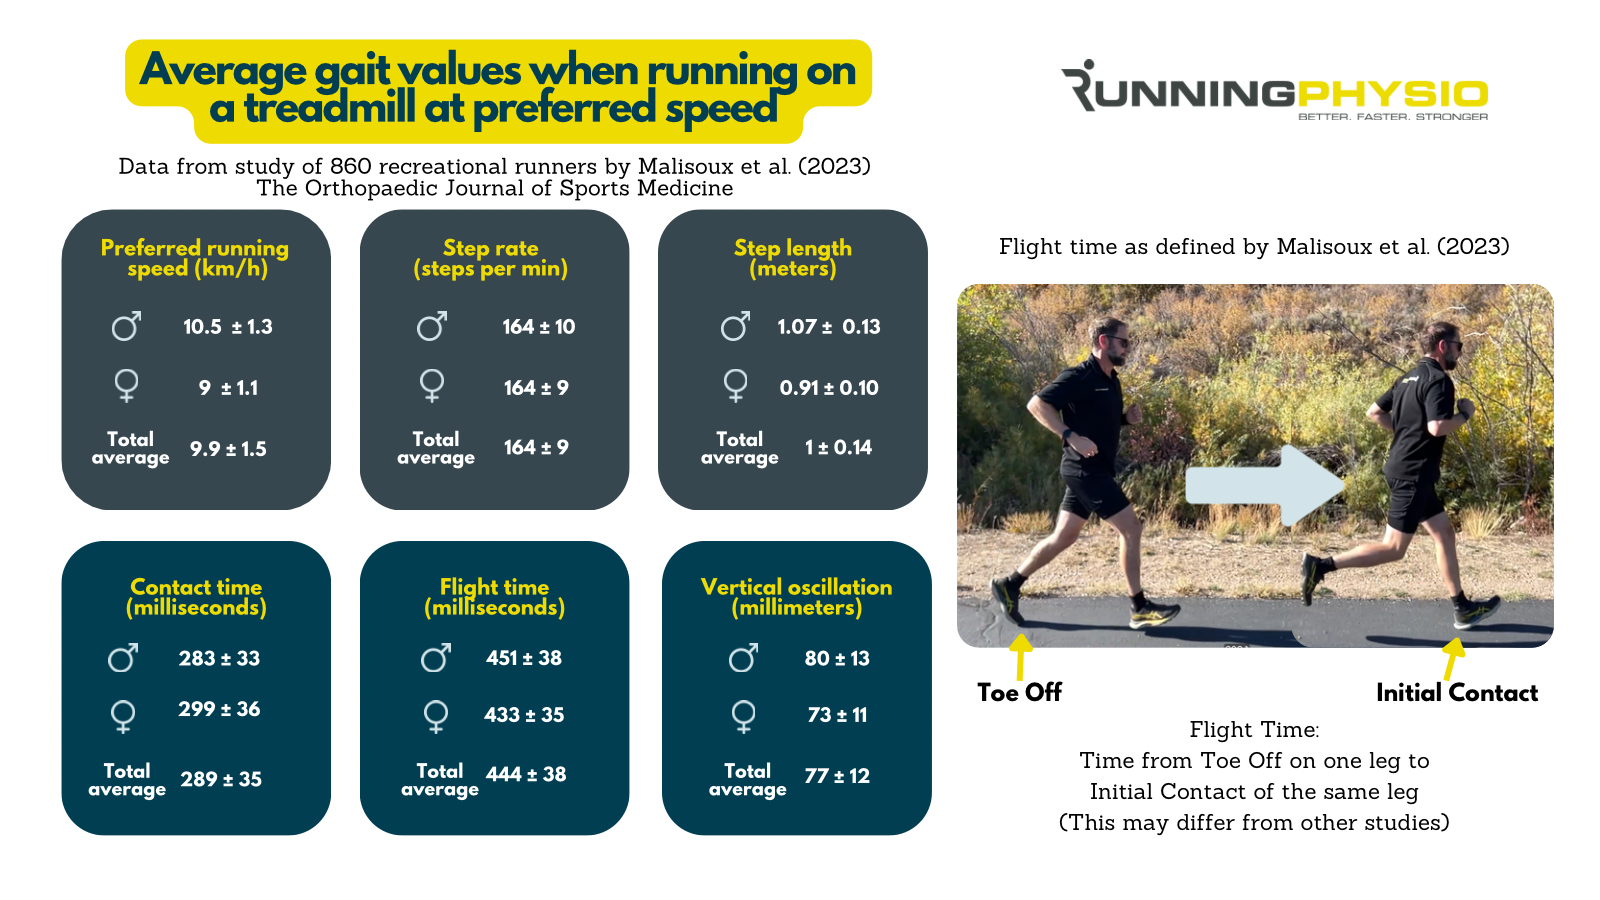
The 2 most common gait factors we address are over-striding and ‘medial collapse’ (narrow gait with pelvic drop and increased hip adduction).
If step rate is low, then increasing it by 5 to 10% by running to the beat of a metronome can help both of these patterns. Alternatively, a cue like ‘don’t let your knees touch’ can be very valuable for increased hip adduction/ medial collapse.


 English (US) ·
  French (CA) ·